UK based
Prices for UK customers are shown inc 20% VAT
Other countries, inc EU, prices shown are ex VAT.
UK based
Prices for UK customers are shown inc 20% VAT
Other countries, inc EU, prices shown are ex VAT.
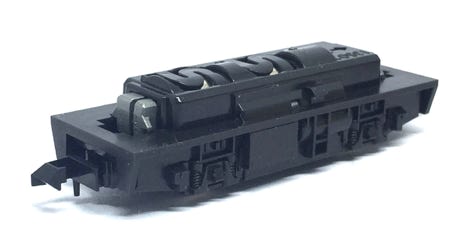
Taking out of the box
Remove the label sticker and take the Allrounder© out of the box by lifting the thin transparent plastic foil that surrounds it.
Running in
I haven’t found a need to run the Allrounder© in. You can just put it to work immediately.
Height Wings
The Allrounder© comes with two different kinds of Height Wings:
- Centre Wings
- Corner Wings
These are to fit the chassis to your model with the supplied M1.6 L6 screws, but also hold the contact strips in place. There is a set of 6 (3 pairs of different sizes: S, M and L). By default, an extra pair of the largest size (L) Centre Wings are fitted to the chassis.

Mounting screws for Centre wings M1.6 L5
Centre wings
Corner wings
Taking out of the box
Remove the label sticker and take the Allrounder© out of the box by lifting the thin transparent plastic foil that surrounds it.
Running in
I haven’t found a reason to run the Allrounder© in. You can just put it to work immediately.


Height Wings
The Allrounder© comes with two different kinds of Height Wings:
- Centre Wings
- Corner Wings
These are to fit the chassis to your model with the two supplied M1.6 L5 screws, but also hold the contact strips in place. There is a set of 6 Height wings: 3 pairs of different sizes: S, M and L. By default, an extra pair Centre Wings of your choosing (selected at ordering stage) are fitted to the chassis.
Which Height Wing to choose
Size M and L are different in width, as well as the position of the screw hole. Which one to use here depends on the space in your model. Size S is for those who do not wish to use the Centre Wings, but then are just holding the contact strip in place.
How to adjust the height of the Centre Wings
One of the great features of the Allrounder© is that you can adjust the height to suit your model. Just unscrew the screw slightly, until you feel you can move the Centre Wing. Then place it to the desired height. You can use the indents to the sides from the wing, as a visual guide to place both the wings at the same height. Or just look from the front of the chassis to compare.
How to replace the Centre Wings
De-solder the motor wires carefully, without touching the plastic, as it would melt. Be aware that the motor is magnetic, so before you turn on the soldering iron, it is a good idea to first test from what distance the soldering iron snaps to the motor. Inside the chassis are two bolts that each hold a screw of the Centre Wing. Unscrew the Centre Wing, remove the screw and place the contact strip carefully in the replacement wing. Then push the screw through the contact strip and hole in the replacement wing.
Fitting the Centre Wings to the fronts
Any of the Centre Wing can also be placed at the front. But to keep the ends of the chassis as short as possible, there is no screw fitting option. You will have to glue the wings in place.
Using the Corner Wings
The Corner Wings comes in two different heights. Check which one suits your model better. Cut them off the sprue with a sharp side cutter (From Xuron for example) to use them. They can be used in different ways.
- To support the bottom plate of your model, but with the Centre Wings screwed to the body.
- To not use the Centre Wings, but use the Corner Wings to screw the chassis to the model. M1.2 L6 screws are used for this and are optionally available from the Tramfabriek.
Please note that you can cut the horizontal plates off with the side cutter, so the Corner Wings become supporting beams (see picture). Also remember that a Corner wing does not need to point outwards. If the wheel diameter allows you enough space, they can also point inwards.
Maintenance
The Tramfabriek sells a maintenance kit for the Allrounder©, which includes a fine Phillips screwdriver with magnet and a little work bench. You can turn the workbench 180 degrees, so it can be used in different ways (see images). The magnet on the screwdriver is very handy to keep the tiny screws stuck to the screwdriver head. My advise is to glue the flat plate on a piece of thick cardboard, as a base for the workbench.


The Allrounder© is already pre-greased, but at one time you will have to refresh that. Ask your model train shop for the right grease to use for model trains, if you don’t have any. Don’t use the same grease you use for a car. If choosing oil, make sure it is oil that is not damaging to plastic. The Tramfabriek sells this kind of oil, but I personally prefer a small dot of grease.
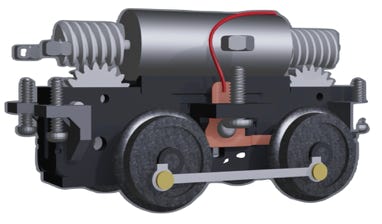
Removing the motor
The motor is one assembly with the saddle below it. To remove the motor, you have to put a small and thin screwdriver under the saddle (or use your thumb nail) and lift it up. There is no clipping system, the saddle is fitted with friction. To fit it, just centre the motor assembly and press it down in its slot. Pay attention that the worms fall into the gears. If you have coupling rods on your drive, make sure both wheels are in similar position. You can adjust one side by slightly lifting up the motor (and with that the worm) on one side.
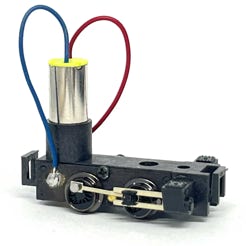
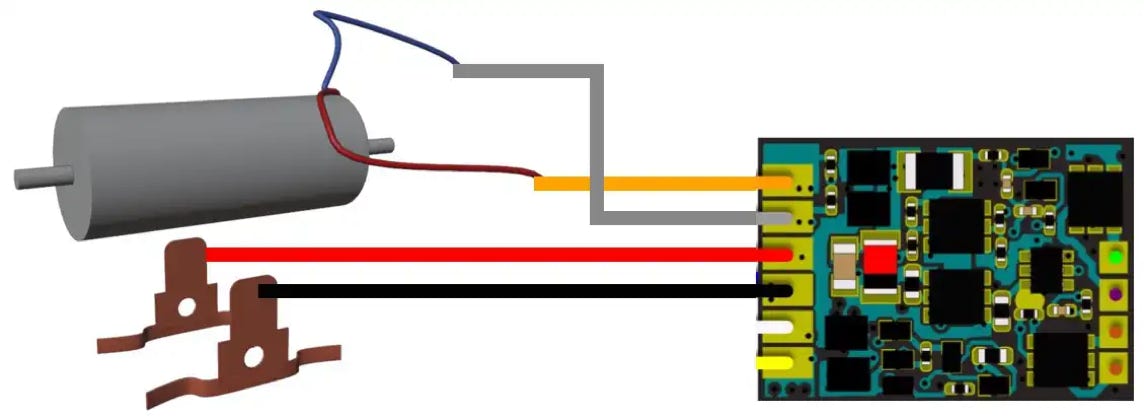
DCC conversion
The cables of the motor have been kept long for the reason that there will be several of you who want to fit a decoder. Fitting a decoder is very easy. Just desolder the red and blue motor wires, no need to take apart anything else. Then solder the orange and grey decoder wires to the motor wires (or, if you feel brave, solder the motor wires directly to the decoder). The red and black wires from the decoder are soldered to the phosphor bronze wheel contact strips for track power. Remember when soldering: quick in, quick out. The chassis is made of plastic, so it would melt if you touch it or linger on the contacts too long. Luckily you have been given extra Height Wings, so you have a second and even a third chance if you mess up. On the picture you can see to what coloured cable of the decoder you need to connect the drive.
Train-O-Matic Micro decoder
Stayalive aka Powerpack
My advice is, if you have the space, to purchase the brilliant Zimo STACO2A Stayalive (see at the right). This gives you an extra few seconds of back up power, which is really essential with light locos with a short wheelbase in DCC. The great thing is that this stayalive PCB integrates the tech for the Stayalive and doesn’t take much more space than the smallest stayalives without this feature! Another benefit is that it is now practically risk free to solder the motor wires directly to the PCB without the chance of damaging the decoder, making the wiring much cleaner and compact. Please note, this is only the Stayalive board, so you need a Next18 decoder, which can be gotten without sound and with sound from the Tramfabriek.
If you still have any question, feel free to contact me.
Stayalive with Next18 socket
STACO2A
Solder wires to model and plug in any Next18 decoder, for stutter free performance.
- Size: 14 x 10.4 x 1.9 mm
- 13 colour coded wires
-With 2 Nano GoldCaps 0,3F/2,7V (4x12mm)